Get started using Lightroom Classic CC – Fast!

Get started using Lightroom Classic CC – Fast!

Get started using Lightroom Classic CC – Fast!

A Crash Course in Lightroom Classic CC

Get ready for the ultimate beginner’s guide to Lightroom Classic CC!  And while I promise to get you up and editing your photos in a flash, there’s a lot to cover so you might want to go grab yourself a cuppa/glass/choccie and settle in 🙂

Already know what Lightroom is and want to jump in and get started?

Skip straight to the Lightroom Classic CC quick start guide

Lightroom can transform your images in a few simple clicks!

get started using lightroom

Why you need Lightroom?

Perhaps you’re wondering why you even need Lightroom in your life?  After all who has time to learn yet another software? Trust me, if you love photography, you’ll LOVE Lightroom. Aside from being a beautifully simple way to edit your photos, it solves many other problems frequent snappers have.

I’m betting you’re just like me! You take so many photos that your phone, camera and computer are always filled to the brim!  Pretty sunsets, nights out with friends, your kid’s funny faces, cute moments or hilarious first class tantrums and even the odd pretty cup of coffee in that gorgeous cafe where the light was just beautiful  . . . .  We’ve all done that right?

So. Many. Photos. Yet, it’s rare that you ever actually end up “doing” anything with them. Especially the ones you take on your camera that you can’t instantly share online!  With these in particular it always seems too hard to organise, edit, share or print the winners. And even thinking of putting the “phone snaps” together with the “good camera” shots to create a yearly photo book . . . that’s the definition of the too hard basket right there! 

This is why you need Lightroom, it’s not just a photo editor, it’s also a photo organiser,  a cataloguing system and a great tool to create photo slide shows and photo books all in one!

With Lightroom you can:

  • Quickly organise all your images from ALL your devices and cameras
  • Add keywords to effectively catalogue your images so you can find what you need when you need it!
  • Easily make pro level non-destructive edits to your photos.  Non-destructive is key – you can play to your heart’s content and not worry that you will destroy the original image – the changes are effectively made like a removable filter over your photo.  Once you like what you see, you can copy these edits to similar photos in one step, saving you hours!!
  • If you shoot in raw, not jpeg,[link] it’s even more important to use a raw editor, like Lightroom to “finish off your images.
  • You can also save your “recipes” you find you use over and over in presets, making it even more efficient to edit your images
  • Lightroom makes it easy to print and share your images at just the right size for every purpose.  Facebook, Instagram, a small print for Grandma.   
  • There’s even a slideshow and photo book creator built in.

Boom!  What more do you need? 🙂

Is it hard to get started in Lightroom?

So you’re sold, but I’ll be you’ve heard Lightroom is hard.  And it’s true, it can seem really confusing the first time you open it.  But it doesn’t need to be.  Working through step by step and focusing only on what you really need it’s actually pretty simple to get started.  

Lightroom has 7 “modules”, but before you break out in a cold sweat, take note that 95% of the time you’re only going to need 2 of them. The “Library” & “Develop” modules.  That’s it!  For now, put a big mental cross through the rest.

The Library Module

Just as it sounds – this is where your photos live.  It’s where yYou’ll import your images, organise and add keywords and also where you’ll export your images in the right format and size for your project.

The Develop Module

I like to call this the fun module, because hello – this is where you’ll edit your images and realise your creative vision.  Everything from basic colour & exposure correction & sharpening to B&W conversions, removing “spots” or distracting objects, bringing back skies and funky effects.

Now you know you only need to know two modules, getting started in these is a snap!

Lightroom Classic CC Quick Start Guide

Let’s bust the myth that getting started in Lightroom can be tricky and overwhelming.  It doesn’t need to be. I’ve put together four steps that will walk you through the key things you need to know to get started. Follow these and you’ll be off to a running start in no time.


Step One: Download and Set up

Step Two: Import photos

Step Three: Edit photos

Step Four: Export photos


Step One: Download and set up Lightroom Classic CC


Download

Lightroom Classic CC is available from Adobe. I recommend the Creative Cloud Photography Plan which gives you Lightroom and Photoshop for $14.29AUD or $9.95USD per months.  Excellent value even if you never end up diving into photoshop!  You’ll get access to the Lightroom desktop app for Mac and PC on up to two devices as well as companion apps like Lightroom mobile for smartphone and tablets.

Open & set up.

When you first open Lightroom Classic CC, you’ll be asked a few things. Don’t panic.  It’s really easy. Breathe and follow these instructions.

Create a catalogue

Lightroom will ask you to create a new catalogue, this is simply where it’s going to store all the information about your photos.  You can go with the default location and name, or choose your own. Don’t stress over it, the default location and name are perfectly fine. 

Creating a catalogue is something you generally only have to do once.

Now it’s time for the fun part!

Step Two: Importing & Viewing images in Lightroom Classic CC


Importing your images

Once you’ve created your catalogue, you need to import images into Lightroom for you to edit.  Even if your photos are already on your computer, Lightroom won’t be able to see them until you import them. 

You can also import directly from your camera, phone or card and when you do this you’ll also be copying your images to your computer at the same time.  Win win!

From your camera or card reader

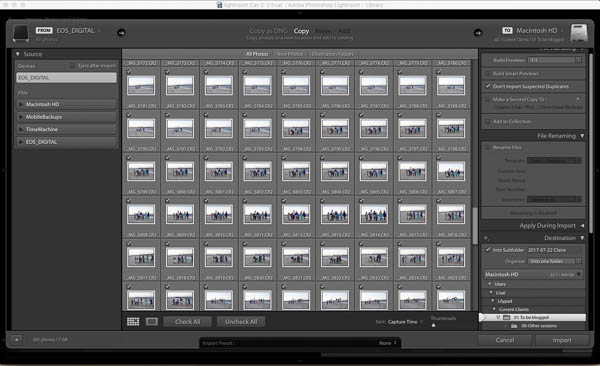
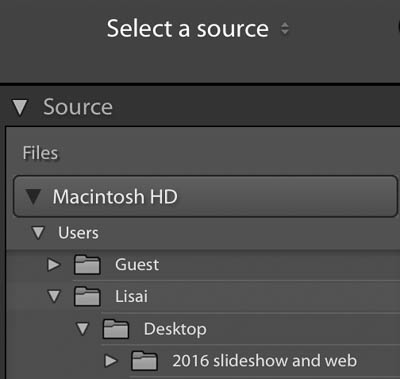
Connect your camera or card to the computer and click on Import on the bottom left of the screen.  You should see this screen with previews of the images you want to import. 

LIghtroom import screen

If you don’t, look at the folders under source on the left and make sure your card/camera is selected. 

Before you start the import – check these settings below only and don’t worry about any others.  Lightroom remembers your last import settings so you only need to do some of these things the first time you import!!

1. Make sure “copy” is selected at the top of your screen. 

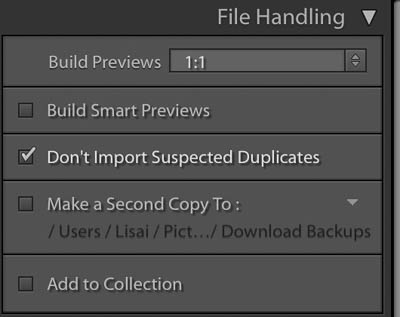
2. Set up file handling.  Lightroom needs to build previews for your images and this can take time – and take up extra hard drive space on your computer.  Choose one of the following

  • 1:1 – if you plan to work on the images very soon – it will take some time but will save you hours later. This setting will also take up the most space on your hard drive.
  • Minimal:  If you just want to back up your phone or camera and won’t look at them for a while.  This is the fastest option and takes up the least space on your hard drive.

You can also check the box “don’t import suspected duplicates”, this is especially handy when you download from a phone, camera or card that you haven’t deleted since last time.

Lightroom Import Settings

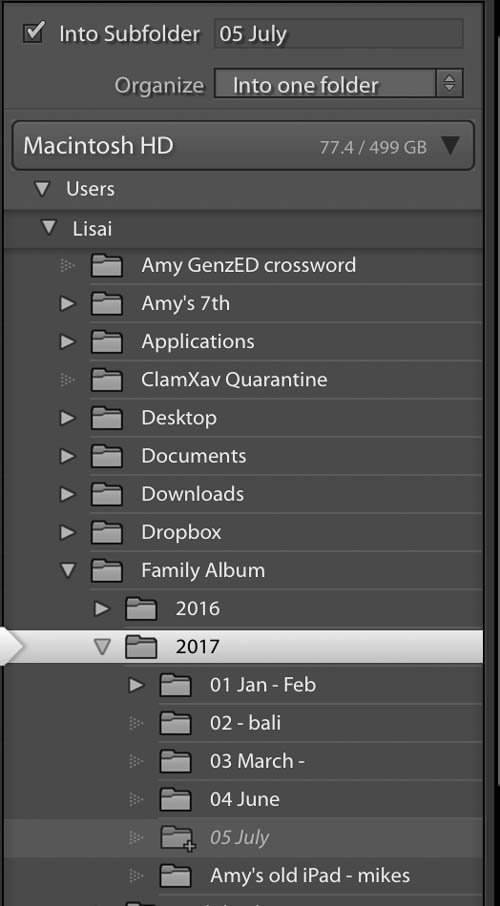
3. Choose a destination.

You need to tell Lightroom where to put your photos on your computer.  This menu is showing you the files and folders on your computer. If you don’t have a folder structure set up for your photos yet, I recommend sorting them into folders by date or month. In the example below, I’m telling Lightroom to put them in the “2017” folder and create a subfolder for this lot called “05 July”.  If you have a folder all set up on your computer, simply navigate to that folder and select it.

Lightroom CC import file management

4.  Choose which images to import. 

Stay with the default select all or choose specific images by making sure they have a checkmark in the corner of the preview.    Don’t try to pick your best images at this stage – that’s where Lightroom shines!   

From your computer

To import images from already on your computer – it’s even easier! 

  1. Navigate to the folder under “Source” on the left then follow step 2 above.  You don’t need to choose a destination because they are already there!

Obviously there are loads of other settings you could use here – but for now, this is all you need to know.

You can now jump in and start processing your photos!

Viewing your photos!

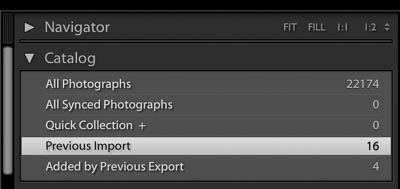
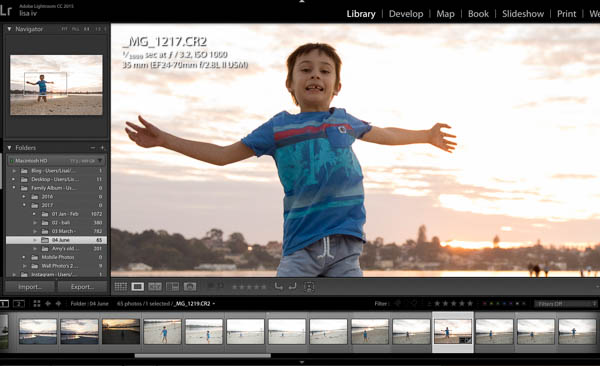
Once you’ve imported your images Lightroom sends you back to the library module, this is where you can easily sort and organise your photos, generally, you’ll be shown all the images you’ve just imported. On the top left panel under “Catalogue”, you’ll see highlighted what is being displayed.

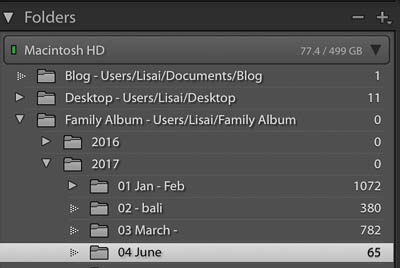
The next block down shows the folder view, just like your computers file browser. Navigate to the images you want to work on.

Now just spend a few minutes checking out the different display options. Click on all of these buttons under the image panel and see what happens – I find I learn better by just doing it 🙂

Lightroom Image display buttons

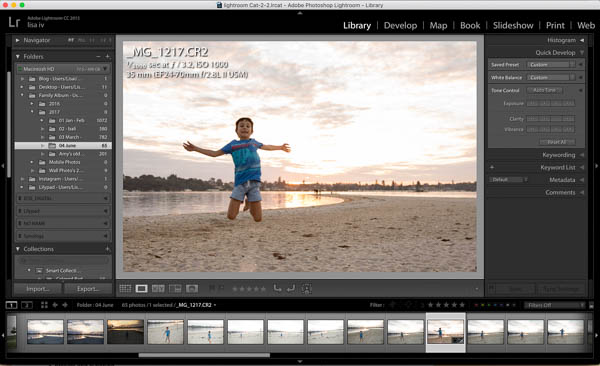
You’ll see to the left is the file browser, in the middle a photo, the bottom a film strip of your images with the selected image highlighted and to the right the quick develop panel

Lightroom Develop module

I recommend clicking on the arrow on the far right and hiding the quick develop panel. I prefer more real estate for the images 🙂

You can also zoom in to check details by pressing the spacebar or choosing 1:1 in the navigator top left.

You can do all sorts of fun things here like create collections add keywords and flag or rate images.  However, this is the quick start guide, it’s time to pick an image and get playing!

Step Three: The develop module – Editing your images

Whoop Whoop – We made it to the fun stuff!! 

Click on the develop module and your photo will now be in Lightrooms “digital dark room”.  Here you’ll be able to crop, adjust colour and exposure, make b&w’s and do local or selective adjustments to just a part of the image including getting rid of unwanted objects. 

The develop module of Lightroom is very powerful!   To learn all that it has to offer is let’s face it, way way more than I can put in one blog post which is why I’m about to release my new Lightroom Classic CC Course, to walk you step by step through everything you need to know!

It is however really easy to get started and make simple adjustments that have A LOT of impact on your image.

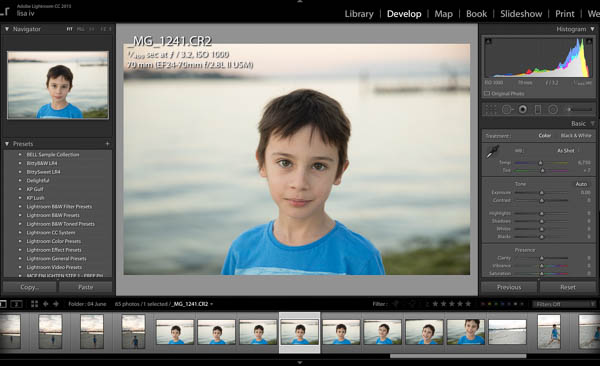
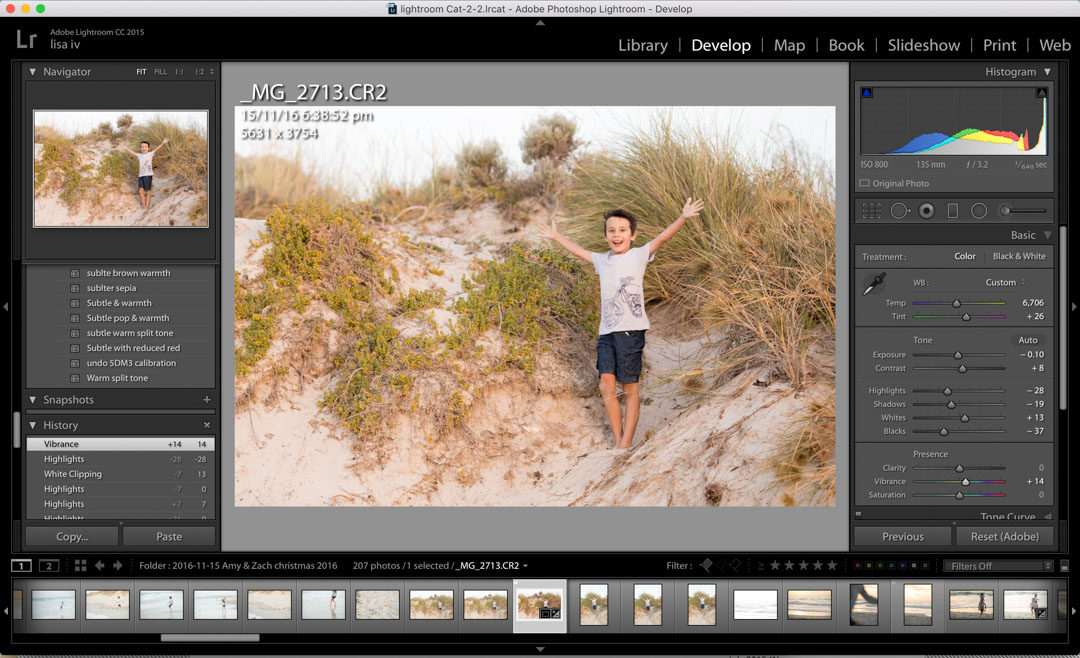
Move to the Develop module by clicking “Develop” on the top right, and this is what you should see.

LIghtroom Develop Module

On the left is the navigator and presets, the bottom the film strip and on the right the tool pallets – where all the action happens! When editing an image I work from the top down through the tool pallets. 

Straightening and cropping

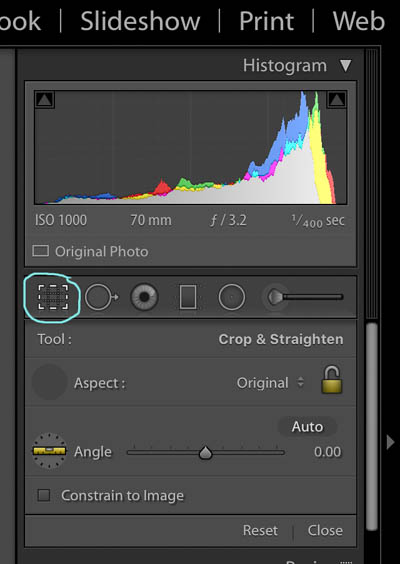
I can’t take a straight photo to save myself so I always start with straightening and cropping my image Click on the crop symbol.

Lightroom Crop Tool

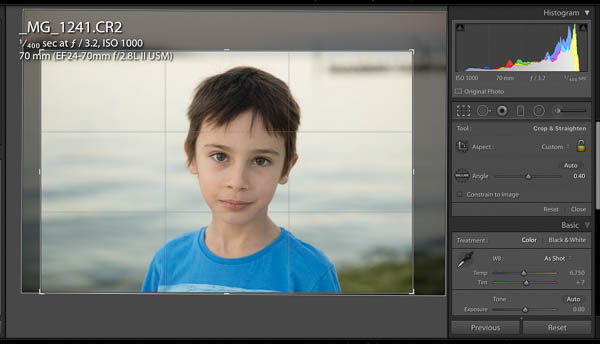
If there’s a horizon or obvious level point, choose the ruler and drag along exactly along the horizon of the image and just like magic, Lightroom will straighten your photo.  You can then click and drag the corners of the crop marks to crop to your liking.  In this image, I’ve cropped in a little.

Cropping in Lightroom

Cose the cropping tool by clicking close at the bottom and move on to the basics panel. 

The Basics Panel

Here’s where the magic happens. 

Lightroom Basics Panel

Follow the panel section in order, from top to bottom and have a play.  Move the sliders back and forth and you’ll quickly learn what each slider does.

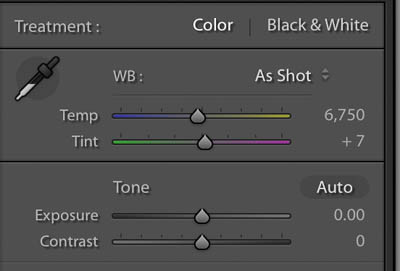
The first sliders adjust the white balance, that is, how warm or cool the colour tone of your image is.

The second section is the tone, these sliders adjust the exposure of various parts of the image. The first two affect ALL of the image, the last four only certain tonal ranges of the image.  For example, the highlight slider lightens or darkens only the highlights (or bright bits) of the photo.

The last section is where you can change the saturation, vibrancy and the clarity (go ahead and drag out the clarity slider and watch your image go crazy).

Don’t forget, these changes are non-destructive!!  This means if you accidentally turn Aunt Mavis bright red with crazy deep wrinkles.  No problem!  You can press reset at the bottom of the tool pallets and start all over again. If you only want to go back a few steps, Lightroom has you covered! On the left is the history panel detailing all the recent changes you’ve made, click by click.  All you need to do is click on the last adjustment you want to keep.

That’s it – go have fun like a kid in a candy store – only better & guilt free!!   All the changes you are making are stored in the Lightroom catalogue and your original image is not being changed in any way.  So you can’t wreck the photo!

When you’re happy with the edits and changes you’ve made, it’s time to “export” the photo.

Step Four: Exporting images – Getting your photo’s out of Lightroom Classic CC

Exporting images in Lightroom is a little bit light using the “save as” function in other software. By exporting, you save a new copy of the image you’ve created, with all the edits, in the format and size you need.

You can export just one photo or a whole folder of photos making it a tip-top time saver – and who couldn’t do with saving time!

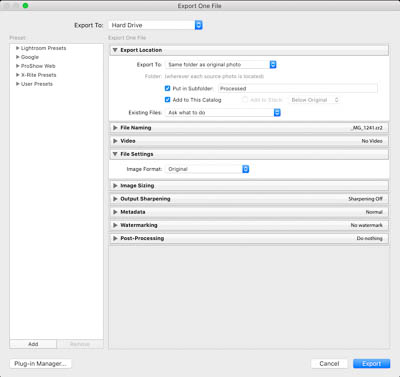
To export images, make sure you’re back in the library module, select the image or images you’d like to export and click “export” on the bottom left. The window below will pop up and you can input your “recipe” for the new file as well as choose a location for the new file(s) to be saved.  Click “Export” and you’re done!

Wait.  But what export settings should I use???

Well, it depends! The ideal settings  (size, colour space, file type etc) will vary for every purpose.  Facebook, Instagram, emailing, the web, prints of various sizes and different media will all have different optimal export settings.

Let’s start with simply saving a new copy of the image, with all the edits.  These settings below will export a copy with all the edits and no other changes (the size will be the same, filename & type the same) and put it into a new folder called “processed”.

Lightroom Export Settings

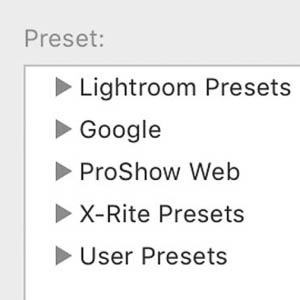
The good news is in Lightroom, you can set all these ideal settings up once and save them in the preset manager and you never have to think of them again.  Ever!! 

Clicking on the various presets under user presets will export an image with the exact settings you need with one click.

Want to know the right recipes that guarantee the best results for all the popular outputs – you can download my free Lightroom CC Export Presets!  All the settings for all the popular outputs already done for you! Facebook, Instagram, popular print sizes, email, Photobook ready and more!!  Easy to instal, and even simpler to export.

And we’re done!  You’ve just had a crash course in Lightroom Classic CC you’re ready to rock and roll! 

So what do I need to do again?

Step One: Download and Set up

Step Two: Import photos

Step Three: Edit photos

Step Four: Export photos

But wait there’s more!

As you can probably tell by now, this is just the tip of the iceberg when it comes to Lightroom, there is soo much good stuff in there I get dizzy just thinking about it. 

What I’ve covered today will have you off and running, but if you’d like more in-depth knowledge of what Lightroom can do I’ll be announcing my Lightroom course very soon, where I’ll guide you step by step through all the goodness, including live walk throughs and exercises.  No questions left unanswered.  To be the first to hear about it and jump in with the super dooper opening offer – make sure your name is on the list on the waiting list so the carrier pigeon and dancing bears will be sent as soon doors open!

Some of the links in this post are affiliate links, however, be assured I only ever recommend products or services I personally use and love.
Don’t say Cheese! – How to get real smiles for the camera!

Don’t say Cheese! – How to get real smiles for the camera!

Don’t say Cheese! – How to get real smiles for the camera!

Capturing natural smiles!

Make it fun – not cheesy!

One of the questions I’m asked most as a professional family photographer is just how do I manage to capture natural smiles?  You’d think something we all do naturally shouldn’t be that hard, but let’s face it – it can be really hard, particularly with kids or for “posed” portraits.

I have two simple rules that will give you the best chance of photographing natural smiles.

Rule one: You have to make it fun!

Yes – It’s really that simple. Keep it positive and don’t ask people to say cheese or you’ll only get that fake square smile, particularly off kids. If you’re photographing your kids you need to work extra hard, make it a game, be silly, crack a joke and no matter what you do, don’t get frustrated and bring out your “parent” voice – it just doesn’t work for photos!  Instead, be as silly as you can. Try acting the clown or cracking a good poo joke. Seriously, poo jokes!! They work almost every time on almost everyone!

Keeping it fun is especially important if your first problem is that your little one doesn’t even want to stand still for their picture!   Rather than rattling off instructions like; “Stand here”  “Stop wiggling” and  “look at me!!!”   Give them something fun to do instead, something to focus on that’s not having their photo taken like looking for the dolphins, bugs, shells or throwing leaves or snow. With older subjects, the same goes, relax them, chat, ask about their interests, don’t take the shot while they are talking, but the smile after.

learn photography

Rule two: Be prepared!

Channel your inner boy scout and be prepared BEFORE you attempt to wrangle the subject.  Make sure you’ve found the right light, angle, backdrop and your camera has the right settings, even take a test shot or two to make sure the light is right and the exposure spot it, and then, and only then, call in your subject.  Nothing brings on the fake smile faster than having to wait while you fix your settings, or worse, missing the magic and having to redo the shot over and over again.

learn photography perth

The only FIVE things you need to get started in photography

The only FIVE things you need to get started in photography

The only FIVE things you need to get started in photography

Have you always wanted to learn photography but keep putting it off until you can afford the gear?  You’d be surprised at how little you really need as a beginner photographer.  Sure, once you “catch the bug” it can get expensive, gear envy can be catching and it can be tempting to splash out on the latest and greatest, newest gadget, accessory, lens, bag, book, prop, guide . . . . you get the idea.  Take it from me, don’t waste your cash.  Get started with just the essentials.  Once you start to progress from beginner to more advanced you’ll quickly understand what it is you need next.  I can’t tell you how often I’ve wasted my cash on things I just didn’t need or don’t use.  Just like buying that pair of jeans a fraction too tight – because you’re soo going to drop a few kg’s – don’t do it!  Chances are you won’t and will never fit them.  On the other hand if you do lose the kg’s, reward yourself with the new jeans.  Once you’ve got the basics sorted, you’ll quickly know where your current gear can’t take you and what you really need next.

So what five things do I recommend for beginner photographers?

One | A camera

Okay, so maybe I’m stating the obvious here, but to get started in photography, you need a camera.  What you don’t need is a whizz bang, high end DSLR.  Any camera where you can change the settings (aperture, shutter speed & ISO) is a great start. Even better if you’re able to change lenses.  As you learn, lens choice becomes a big part of the creative process. Look around for a second hand camera, you don’t need the latest one to get started.  Entry level DLSR camera’s are also becoming more and more affordable, take a look at my DSLR buying guide for more tips on buying your first camera.

Two | A fast prime lens

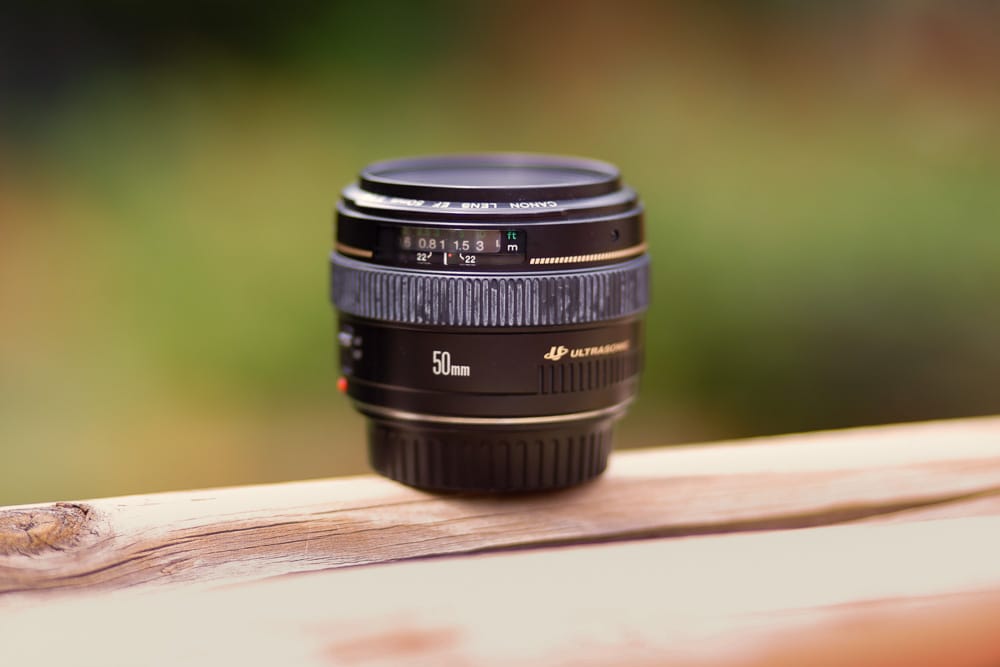
Kit lenses are great to get you started, but they have limitations and you’ll get a lot of bang for your buck by investing in a “good glass,” a fixed prime lens.  The good news is the next best lens is also the most affordable! Most professional photographers out there agree you can’t go past a 50mm prime lens.  The f1.8 version in most popular makes is less $200.  You’ll be able to shoot with less light, create a shallower depth of field (that lovely blurry background look) and failing a catastrophe, outlive your camera body so it’s money well spent. Read more about the all the benefits of the nifty fifty here.

five things need get started photography

THREE | A step by step beginners guide

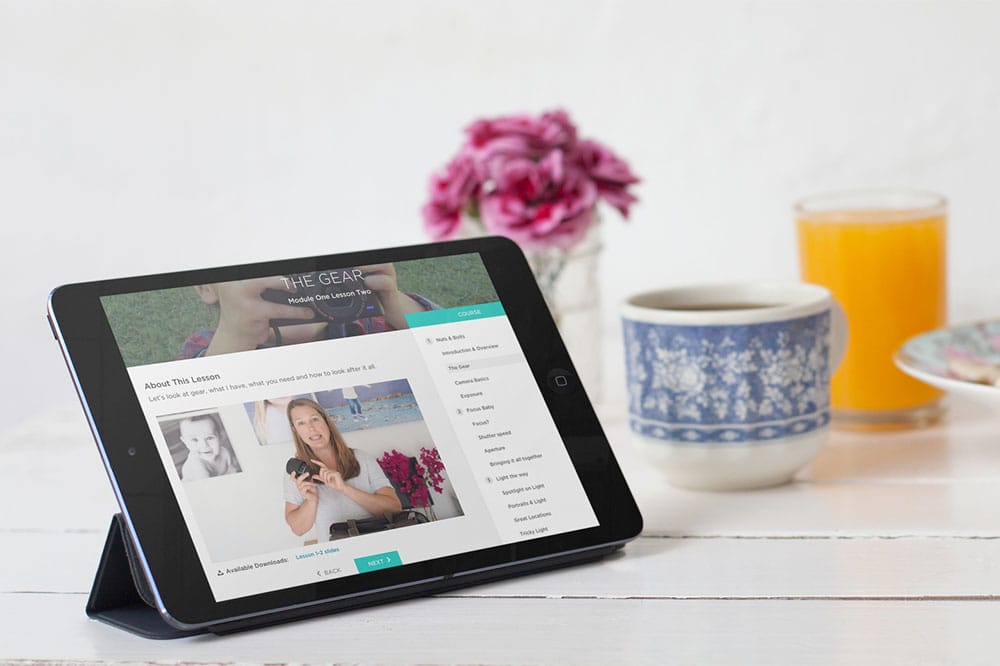
Let’s face it, once you start to move beyond point and shoots, photography is confusing!  Getting to know all the settings and understanding the basic concepts is like learning a new language.  Forget about the manual, you pretty much have to already understand the basics to make any sense out of it.  You can find lots of information on the web, gather great nuggets of information here and there and piece it all together and start taking photos you love.  But let’s face it, even with great free resources like Club Lilypad out there, doing all the research yourself is time consuming and it can be hard to find what you need with out know what your looking for.  A good step by step guide to get you off auto and confidently using your camera is like your fast track golden ticket to the fun park!  You can skip all the frustration and be guided right to the fun part of playing and taking great photos.  If you love taking photo’s of your family, you can’t go past our online beginners course, Photography Launch Pad – learn your camera and how to take great family photos at the same time!

five things need get started photography

FOUR | Partners in crime

Learning something new is always better with friends.  It’s always great to have someone to bounce ideas, problems and successes off. Learning with other people can also bring in some accountability, like having a fitness training partner!  Why not find out if a friend wants to learn together, set some goals and have fun learning together.  If your on facebook, there are a lot of communities out there for beginners and don’t forget the good old camera club. You can gain a lot of meeting up face to face and the wide variety of people and skills in camera clubs can be a gold mine!  Many workshops and courses also form spin off groups and communities to help facilitate learning.

FIVE | You time!

Ok so this isn’t the easiest on to find. I get it, I’m a Mum, whether you work or don’t, finding time to yourself can be hard.  Trust me –  it’s really worth making it happen!  Not only will you be a better Mum/wife/partner by spending time on you.  The only way your’e going to learn is to practice.  The good old saying practice makes perfect could have been written for photography.  The more you shoot, the more you play, the more you start to understand how to get the look you want.  Take your camera with you everywhere you go, keep it out on the kitchen table, or even set yourself a photo a day project.  Whatever it takes to get you snapping!

Fix your focus disasters in less than 5 seconds!

Fix your focus disasters in less than 5 seconds!

Fix your focus disasters in less than 5 seconds!

You know when you take the perfect photo, the one when the stars align, your actually child looks AT the camera and smiles their magic natural smile and you clicked the shutter at just the right time.  Then you take a closer look at your photo only to fall flatter than a pancake when you realise it’s completely out of focus.  You got the shot, yet missed it at the same time!

It’s seems to be such an obvious thing, but it’s amazing how often focus is the downfall of a masterpiece.  This one trick, will help fix your focus issues in less than 5 seconds. I promise.

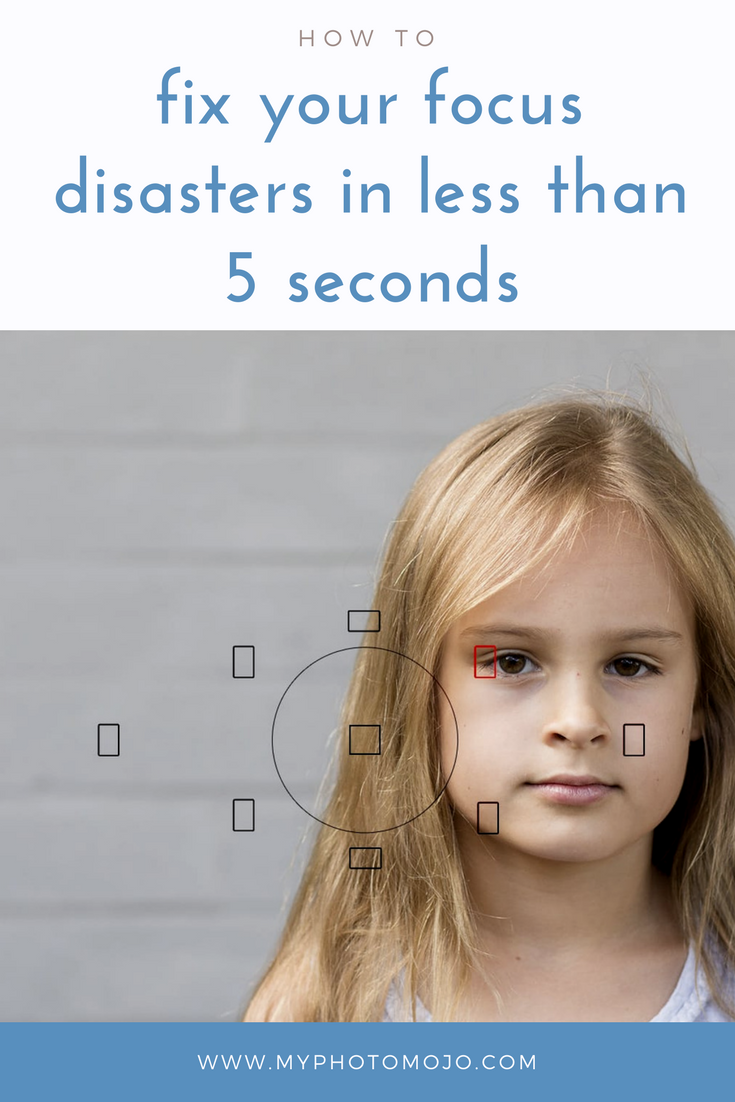
With almost all cameras, be it your point and shoot or your DSLR, you need to tell the camera where you want it to focus.  I’m not talking about manual focus (my eyes are rarely good enough for that) but manual focus point selection.  Don’t let the camera decide (like with those fancy face detection features) where the image should be sharp.  There’s a good chance your camera will decide the wall, trees, or even a portrait on the wall behind you is is what counts, and you’ll end up with your main subject blurred.  If your using your phone, tap on the screen to tell the camera that’s exactly where you want the image sharp.

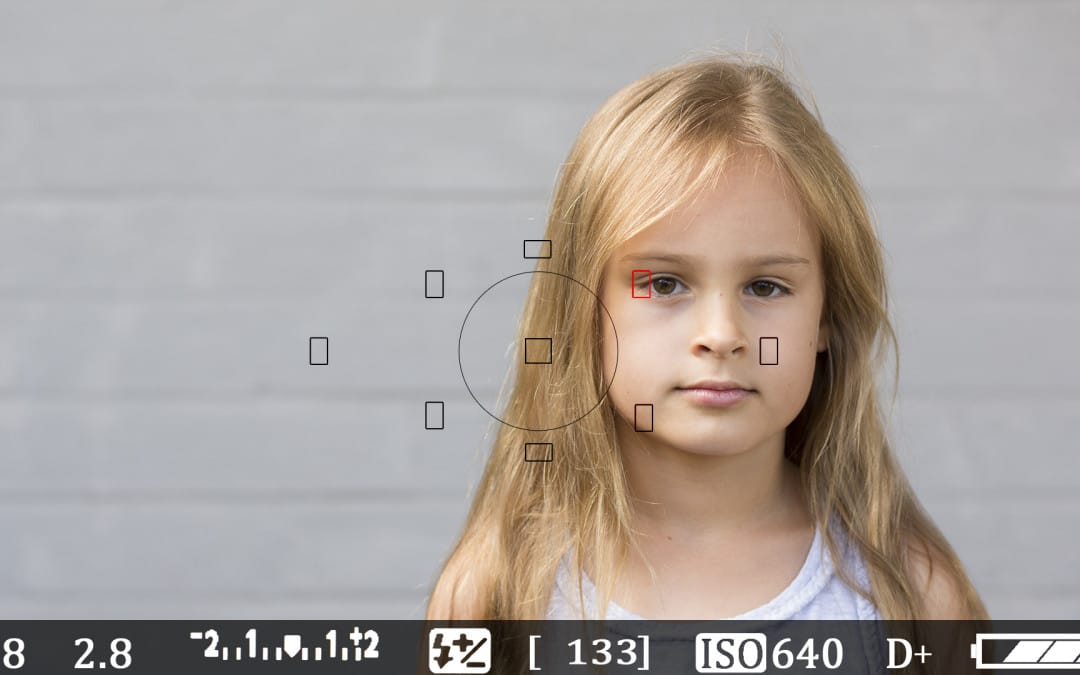
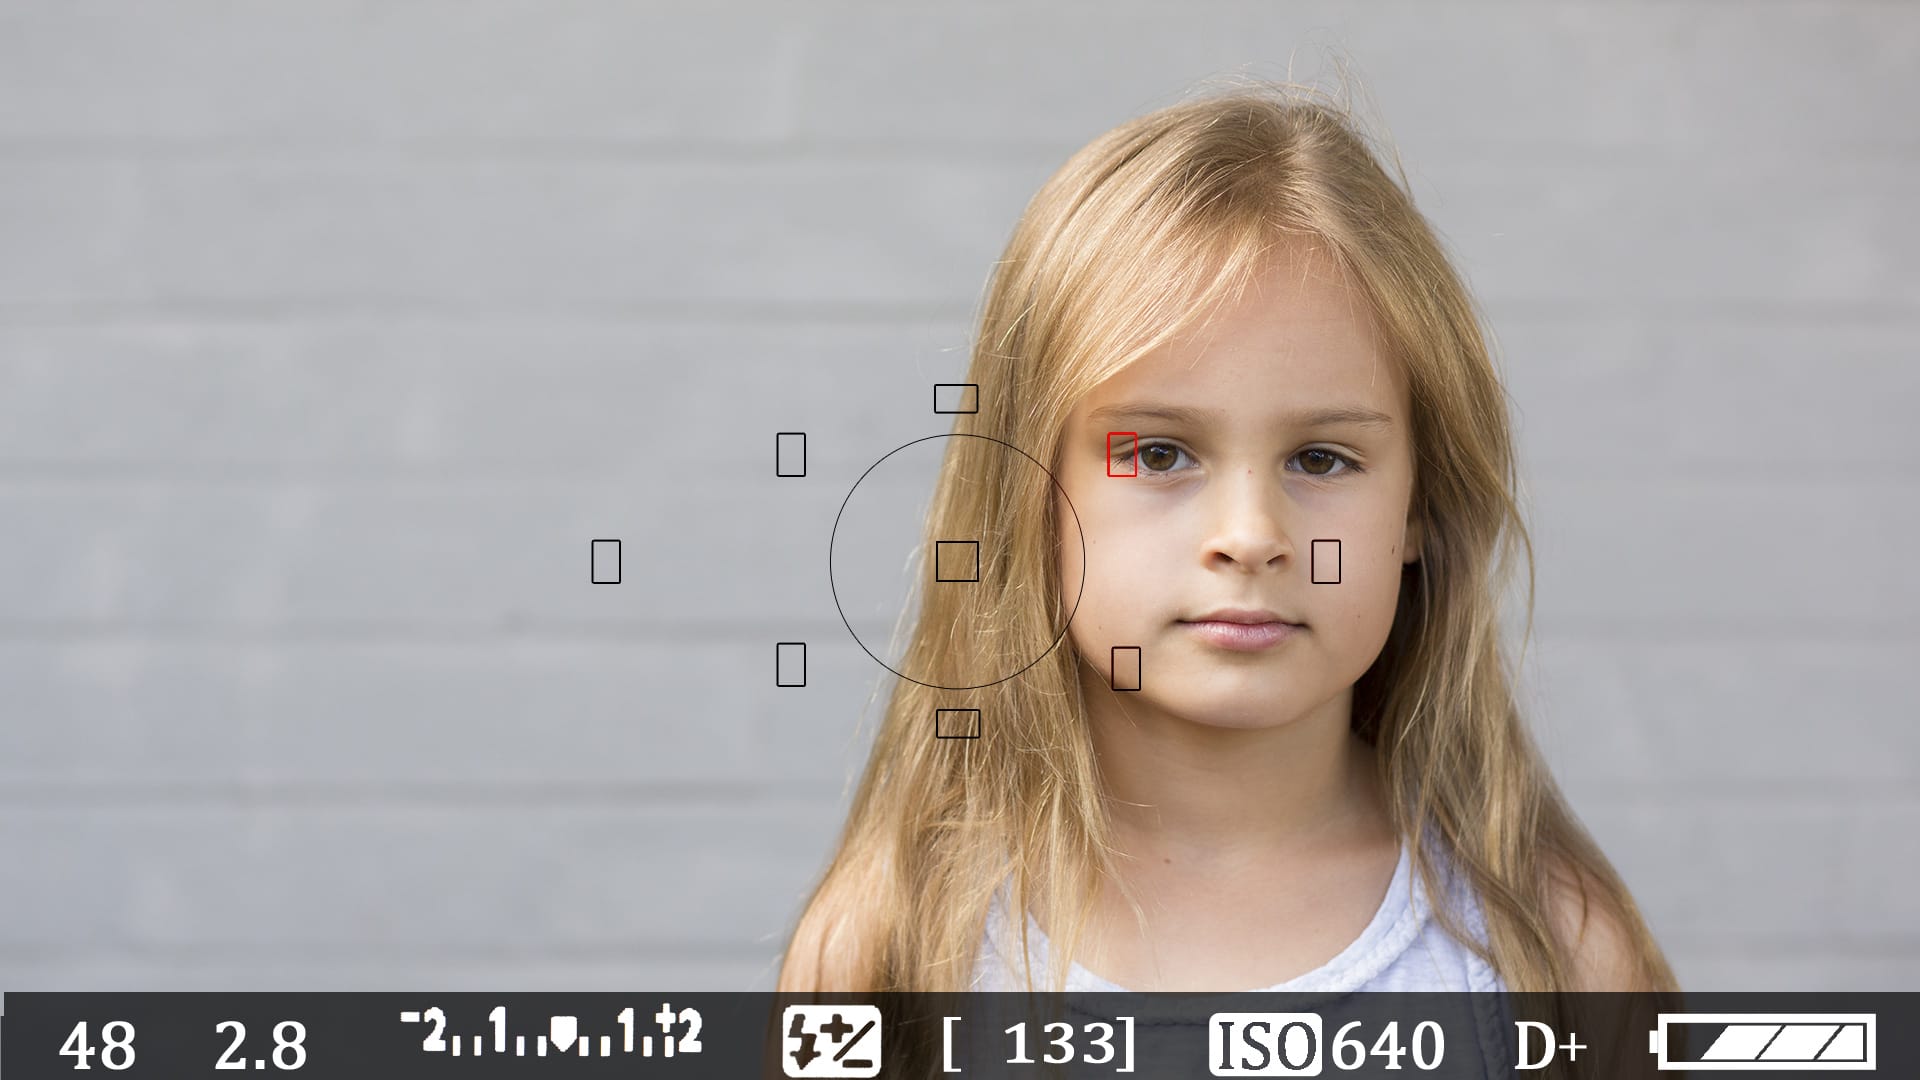
On your DSLR, set the camera so that you can choose the focus point manually (you’ll need to check your manual to find out how), with most camera’s you then choose one of those squares you see in the lens, place it over the subject and press the shutter half way so the camera can focus.

learn photography

If your camera is focusing on the wrong place, your image won’t be sharp where it counts.  In this shot, the wall is in focus, not the girl.

photography course

By simply taking charge and telling the camera where you want it to focus, you’ll never have a wall sharp over your subject again!

For bonus points when taking photo’s of people, remember, it’s all about the eyes when it comes to focus.  If the eye is sharp, it almost doesn’t matter if nothing else is.

learn photography

Even just a slight miss focus can wreak a portrait.

photography course

Sharp eyes help you connect.

Take charge of your focus points and you’ll be reward with sharp images, right where it counts.

A Mum’s guide to buying your first DSLR

A Mum’s guide to buying your first DSLR

A Mum’s guide to buying your first DSLR

Christmas is coming and you’re thinking of finally splashing out on a fancy camera.  You start looking around online, looking in a few shops and it doesn’t take long to realise there are more cameras to choose from than dishes at your local Chinese!  How on earth do you narrow it down to the right one for you?  Well, I can’t help you with choosing your dinner (I normally just want it all) but I can when it comes to choosing your camera. 

Here’s my top 4 things to consider when buying your first DSLR camera.

1 – Do you really want a DSLR?

A DSLR is a “big fancy” camera with interchangeable lenses.  It’s what the pros use and will give you the best quality results.  BUT – to get those results you have to know how to use it.  If you buy a DSLR and never take it off Auto, you’re better off buying a smaller, more compact point & shoot.  Your images won’t end up looking that much better, and you’ll just need a bigger bag to carry it all.  If you’re happy to spend a little time learning all about your camera (I can help you there) and are maybe even looking forward to getting a little creative, then go for it!  You won’t regret it!

Remember though – a DSLR is not going to magically fix your photos on it’s own. It’s going to be a team effort between you and the camera 🙂

2 – Price

Entry level DSLR’s are relatively inexpensive these days.  If you’re not sure how much you’ll use it, these are a great option.  If you’ve always looked longingly at gorgeous photos and wished you could do it to, and are serious about documenting your family, then perhaps consider a midrange camera and putting in a little bit more.

3 – Features

All camera’s have loads of features and when moving to a DSLR it can be hard to see the woods for the trees!  So what’s important?  Well, the first thing you can forget about is Megapixels.  It just doesn’t matter, any DSLR these days will have enough for your needs, so don’t even worry about this one.   Other feature that also used to matter a lot, aren’t such a big deal anymore either – even entry level cameras have decent ISO performance (this is how sensitive the camera is to light) Video (if video floats your boat)  and other things like shutter speeds, file types etc. Sure, the better the model the better all these things will be, but entry level cameras are pretty good these days.

So what counts then?  Well, it’s the handling, slightly improved sensors (picture quality) and durability that counts.  Entry level DLSR have controls that make it hard to work in full manual, without dedicated shutter and aperture  controls you have to go through menus which can make it harder to work when your kids are running around – so 95% of the day. The quality of the body itself gets sturdier as you go up. 

How does it feel in your hands:  The two main players in the field are canon and nikon.  While I shoot with canon there is no right answer here. If you can, go to the shop and pick up the models you’re looking at, play with the dials and see which one feels right in your hands. 

4- Accessories

Here’s the thing about DSLR’s.  The camera body is just one half of the picture.  The lens is the other.  The “kit” lenses that come with your camera are going to be OK for getting starting and learning the ropes.  For the biggest leap in your photography quality you’ll want to start getting some good glass.  The best bang for your buck and a lens I’d strongly recommend you try to stretch the budget and include a nifty fifty in your initial purchase.  You can read all about that lens here.

So there you have it.  Do you have any specific questions?  Seen a great deal you’d love to share? – Comment below and let us know or just ask!

The nifty fifty – taking it to the next Level!

The nifty fifty – taking it to the next Level!

The nifty fifty – taking it to the next Level!

You have your swanky new DSLR camera with its kit lens, or even two kit lenses – you’ve had a bit of a play around, got to know the camera and it’s features and like many of us before, you’re hooked on photography and now you’re wondering what to buy next. The best advice out there is to invest in “good glass”, a quality lens. The right lens will improve your image quality and failing a catastrophe, outlive your camera body so it’s important to choose the right one.

Most professionals agree, for your second lens you can’t go past a 50mm prime lens.

Lenses come as either a zoom lens or prime lens which has a fixed focal length, why would a photographer choose a fix over the ease of a zoom lens? Prime lenses are naturally simpler in design, have less moving parts and therefore generally have better image quality as a result, particularly at the budget end of the lens spectrum.

With all the choices out there; wide-­angle, telephoto, macro, why does the 50mm get such a strong vote?  There’s a few good reasons.

Shallow depth of field

When you see portraits with gorgeous soft burred backgrounds behind the subject, it’s called a shallow depth of field. One of the key ways to achieve this is to use the lowest aperture or f-­stop you can. Most kit lenses go down to f/3.5 at the most and truly shallow depth of field starts at around f/2.8. The nifty fifty will go down to f/1.8 for around $150 AUD.

Great for low light

Another bonus of being able to shoot at low apertures is you can shoot in much darker places than before. Shooting your family with natural light indoors will be easier and brighter with the nifty fifty.

It’s versatile

Some lenses are perfect for one or two uses such as landscapes, portraits, wildlife or sport but aren’t as good at anything. The Fifty does a great job at all of these. As an added bonus it’s small, lightweight and fast at focusing, making it a really nice lens to use

Value for money.

It’s close to what we naturally see. A 50mm is the closest to capturing what your eye sees naturally. Your images will naturally look like you see.

Now you know what to put on your christmas or birthday list!

Your welcome 🙂