The magic of balance and the exposure triangle

The magic of balance and the exposure triangle

The magic of balance and the exposure triangle

Part two of our series of posts on exposure

Part one: good exposure and how to recognise it.

Now we now how to recognise good exposure, just how does our camera capture just the right balance of light in our photo?  Of all the many buttons, dials and knobs on our cameras, there are three key settings that control the amount of light in our photos and thus the exposure.  Shutter speed, aperture and ISO.  If the camera has the right balance of these three elements, our photo will have the correct exposure.  Easy right?

Because you’re reading this, you’ll likely be a bit of a visual person, what with loving photos and wanting to take better pictures and all. So there’s a good chance you read the paragraph above, maybe even said the words in your head but your brain really only registered, blah, blah, blah, shutter speed, blah, blah, balance. At least that’s what my brain does when it reads something new 😉

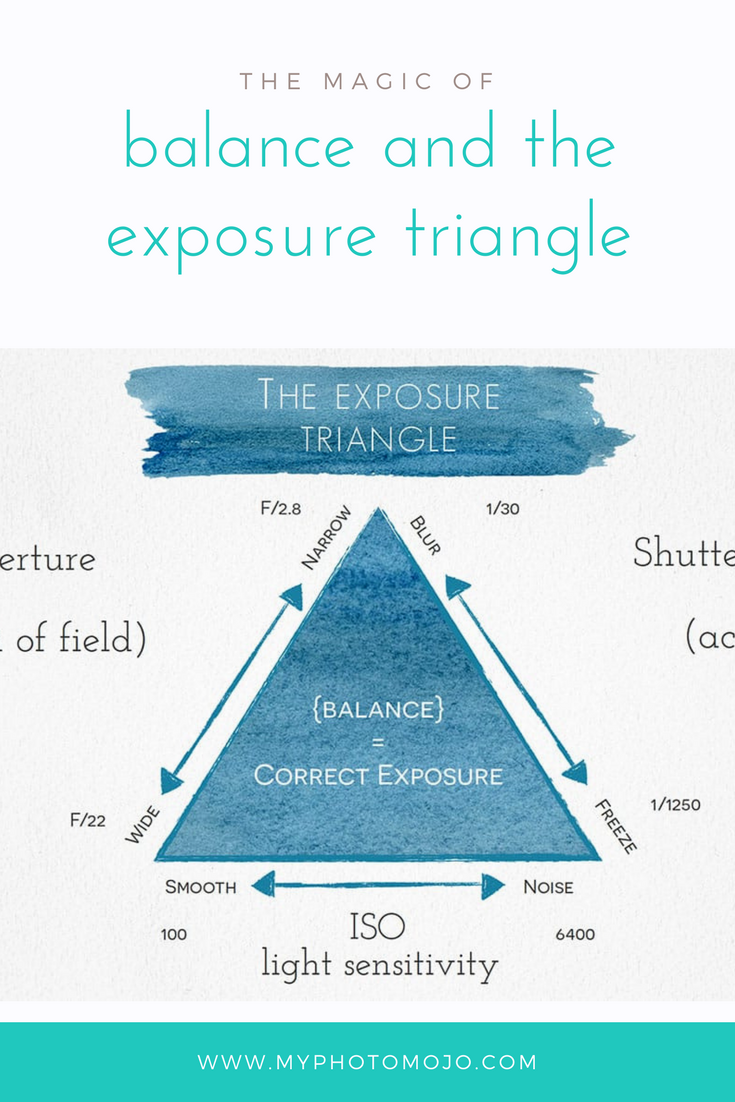
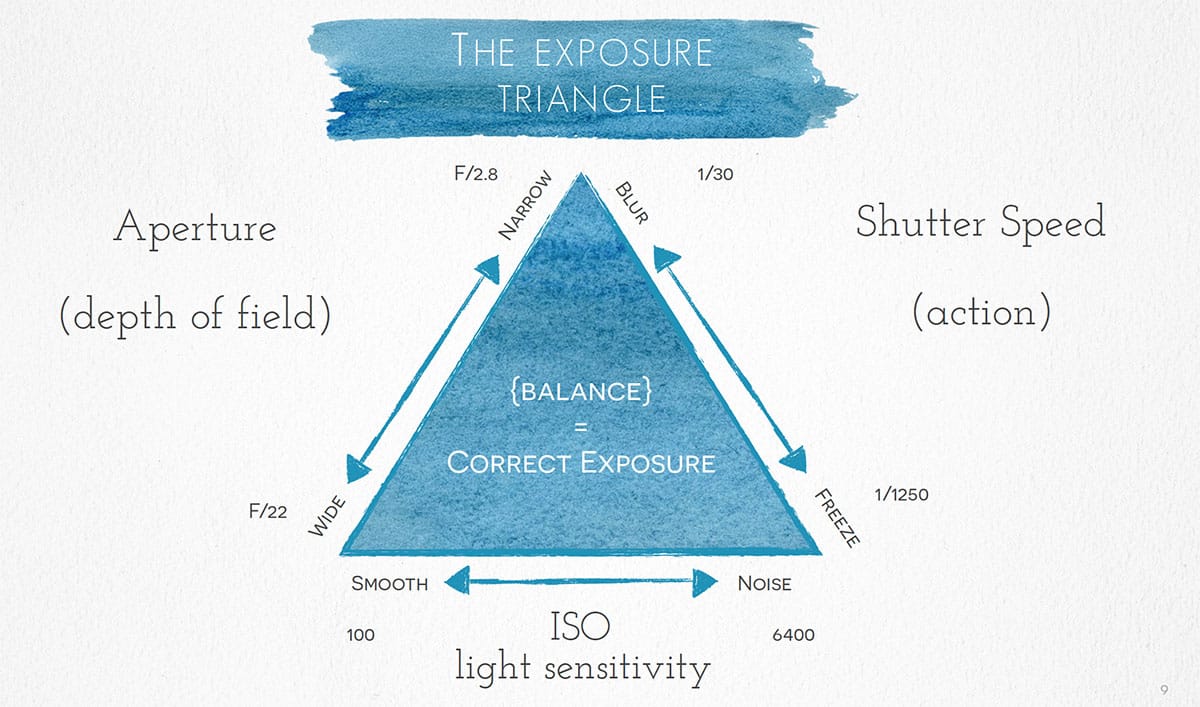
This is where the exposure triangle comes in. It’s a lovely graphical representation of the three key elements that need to be balanced to achieve correct exposure. If you’re shooting in auto, your camera will do this behind the scenes for you, mostly choosing the “safest” middle ground balance of the three elements and often lacking the magical creativity these three elements bring to photography.

 This is where the magic of manual photography comes in! Each of these elements has a different creative effect on your photo, depending on how you balance these settings, you can really change the way your photo looks, just like magic!

  • Shutter speed can freeze or blur motion,
  • Aperture can ensure the whole image is sharp, or the distracting back ground is burred, and
  • ISO increase the sensitivity of the camera to light so we can shoot in darker locations, with the trade off of increased grain when ISO is high.
learn photography

Right now, this might not mean much to you, other than as an interesting trivia answer.  But if you’ve always wanted to get off auto and take control of your camera.  You’ve just taken the first step!

Keep an eye out for part three, where I’ll go into a little more about these three elements 🙂

Behind the Scenes | How to take the perfect jumping photo!

Behind the Scenes | How to take the perfect jumping photo!

Behind the Scenes | How to take the perfect jumping photo!

Time of Day & Location notes

This particular image was taken before sunrise and on the beach, but you can take a jumping shot when ever you find great light and in almost any location.  You simply need to keep you eye out for any elements that might clutter your frame or distract you from the action.

Setting the scene

Too easy for this one.  Find a spot and ask your child to show you how good they are at jumping!

Have fun with this shot, make sure your shutter speed is nice and fast and it helps to have your camera on rapid fire so you have plenty of images to choose from.

The tech stuff

I used my 50mm f/1.4 USM lens, the nifty fifty will work just as well. Any focal length can work, that will depend on what you also want in the image.  I set my aperture at f3.2 and the shutter at 1/800 to freeze that jump then adjusted the ISO to ensure correct exposure (in this case ISO800).


learn photography

THREE FROM THREE!!! 2016 PROFESSIONAL FAMILY PHOTOGRAPHER OF THE YEAR – AGAIN!

THREE FROM THREE!!! 2016 PROFESSIONAL FAMILY PHOTOGRAPHER OF THE YEAR – AGAIN!

THREE FROM THREE!!! 2016 PROFESSIONAL FAMILY PHOTOGRAPHER OF THE YEAR – AGAIN!

Last week was the WA Epson Professional Photography Awards.  The WEAPPAs!  It’s a time of year I love for so many reasons.

  1. It’s fun!  For a few days I get to crawl out of my dark editing cave and catch up with great friends, make new friends and generally talk to other grown ups who love photography.
  2. There’s always lots of chocolate.  Lots!
  3. The challenge of finding/creating/shooting and/or editing my entries is unbeatable.  Every year I go through my past few years work, assessing and reviewing where I’m at and where I’m headed.   Some years I’m inspired to create new work, learn new techniques and push myself further than I’ve gone before. Without the unmovable deadlines, these works might stay on the one day list.
  4. Inspiration.  WA has some absolutely amazing photographers and the work that is entered blows me away every year – with out fail!
  5. There’s the mountains of chocolate.  I do love chocolate.

This year I’ve been really busy, I’ve started up a this fab new venture and have loved teaching 100s of Mums how to use their camera’s and take photos of their kids they really love.  I’ve still been working full time at my portrait studio, Lilypad Photography, and running two businesses take a lot of time, so I was tempted not to enter the awards this year.  I hadn’t found time to shoot anything new, or added any extra creative elements to shoots.  I’d been busy taking photos parents love.

Having reached my Master of Photography, I was excited enough to officially be invited to judge at the awards, a goal I’ve aspired to for since I started entering!  A part of me felt judging this year would be enough, a new exciting challenge.

However, it’s also a fact that I suffer from FOMO (fear of missing out).  It was this FOMO, and the knowledge that it’s way more exciting to have your images in mix, that lead me down the familiar path of finding four images from the past two years.  I found my four. cleared one “school hours” day to prepare them to an awards standard.  I made my printing appointment with PJ at Perth Pro Lab.  Off to my framer for expert matting.  Then I sent them off to be judged in the family portrait category.WA-STAMPS-11

Never in my wildest dreams did I imagine I’d win the category. Again.

For the third year in a row. Wow!

Thank you to my completely awesome clients who allow me into their lives to capture these heart warming images. Thank you!

Lisa

Your WA Professional Family Photographer of the Year 2014, 2015 and 2016!

And because this is a photography blog! Here’s my winning entries.  Hands up if  you’d like to hear  a behind the scenes on how I created the images?

raw vs jpeg

JPEG or RAW | How to choose the right file type for you!

JPEG or RAW | How to choose the right file type for you!

JPEG or RAW | How to choose the right file type for you!

You’ve finally got yourself the fancy new camera you’ve always lusted over and you’re sitting at the kitchen table, cup of coffee in one hand, the manual in the other and your camera at the ready.  As well as skimming over a bunch of new words and concepts that make less sense to you than a calm kid after sugar, you realise you now have to choose your file type, as well as jpeg, you can choose something called “raw”.  I mean that sounds rather serious, that’s one setting you’d want to get right straight up yes?

A quick google and you find the online world is divided in it’s advice.  Who do you believe? How do you know what is going to be the right setting for you?  Close google (unless it’s brought you here) I’m going to make it as easy peasy for you to choose the correct file type for YOU! It’s all going to come down to what your plans are once you’ve pressed the shutter, but for most beginners, I’m going to recommend jpeg.

The difference

First up, let’s look at the difference between a raw and jpeg file.  A raw file, is just that – it’s all the raw data about your image, with no processing or compression by the camera.  This means, it’s a large file and it has ALL the detail and information the camera was able to capture in the file.  However, because it’s “raw” it can look flat or lack pop straight out of the camera, it’s designed to be processed in image processing software before the image is complete, so to speak.  A jpeg file has been processed & compressed by the camera.  This means it’s a smaller file and some of the detail and information the camera deems unimportant has been lost.  A jpeg image can be ready to go straight out of the camera, it will already be processed to match the look you’ve chosen right in the camera.

This makes it sound like jpeg is a bad thing, why on earth would you want parts of your image to be lost!  Clearly raw is the way to go right?  Well, no.  In fact, for most beginners jpeg is the best option initially.

The recommendation

If you don’t plan on processing your images on the computer in the near future and simply want to focus on taking better images with your camera, stick with jpeg.  Shooting raw will mean you won’t be seeing your image’s full potential, they won’t look as punchy as your phone or point and shoot images or you’ll be bogged down processing them rather than learning how to use your camera.  Plus, you’ll have to convert the file before you can email it, post it online or even send it to be printed.  Keep things simple, shoot in jpeg until you master the basics on your new camera.  Once you start feeling the urge to “play” in Photoshop, trust me it happens to us all, then start shooting raw.

If however you would like to process your images on your computer now or in the near future – in Lightroom or Photoshop for example – shoot in raw.  I’ll post soon about all the benefits to raw shooting, once your’e ready to get creative in the digital darkroom.

Whichever file type you choose, jpeg or raw – I always recommend selecting the largest file size option.  Don’t bother with smaller files. Every camera will be different in what they call them (superfine, L etc), just be sure to go for the largest one.

raw vs jpeg

Raw image

raw vs jpeg

jpeg

The only FIVE things you need to get started in photography

The only FIVE things you need to get started in photography

The only FIVE things you need to get started in photography

Have you always wanted to learn photography but keep putting it off until you can afford the gear?  You’d be surprised at how little you really need as a beginner photographer.  Sure, once you “catch the bug” it can get expensive, gear envy can be catching and it can be tempting to splash out on the latest and greatest, newest gadget, accessory, lens, bag, book, prop, guide . . . . you get the idea.  Take it from me, don’t waste your cash.  Get started with just the essentials.  Once you start to progress from beginner to more advanced you’ll quickly understand what it is you need next.  I can’t tell you how often I’ve wasted my cash on things I just didn’t need or don’t use.  Just like buying that pair of jeans a fraction too tight – because you’re soo going to drop a few kg’s – don’t do it!  Chances are you won’t and will never fit them.  On the other hand if you do lose the kg’s, reward yourself with the new jeans.  Once you’ve got the basics sorted, you’ll quickly know where your current gear can’t take you and what you really need next.

So what five things do I recommend for beginner photographers?

One | A camera

Okay, so maybe I’m stating the obvious here, but to get started in photography, you need a camera.  What you don’t need is a whizz bang, high end DSLR.  Any camera where you can change the settings (aperture, shutter speed & ISO) is a great start. Even better if you’re able to change lenses.  As you learn, lens choice becomes a big part of the creative process. Look around for a second hand camera, you don’t need the latest one to get started.  Entry level DLSR camera’s are also becoming more and more affordable, take a look at my DSLR buying guide for more tips on buying your first camera.

Two | A fast prime lens

Kit lenses are great to get you started, but they have limitations and you’ll get a lot of bang for your buck by investing in a “good glass,” a fixed prime lens.  The good news is the next best lens is also the most affordable! Most professional photographers out there agree you can’t go past a 50mm prime lens.  The f1.8 version in most popular makes is less $200.  You’ll be able to shoot with less light, create a shallower depth of field (that lovely blurry background look) and failing a catastrophe, outlive your camera body so it’s money well spent. Read more about the all the benefits of the nifty fifty here.

five things need get started photography

THREE | A step by step beginners guide

Let’s face it, once you start to move beyond point and shoots, photography is confusing!  Getting to know all the settings and understanding the basic concepts is like learning a new language.  Forget about the manual, you pretty much have to already understand the basics to make any sense out of it.  You can find lots of information on the web, gather great nuggets of information here and there and piece it all together and start taking photos you love.  But let’s face it, even with great free resources like Club Lilypad out there, doing all the research yourself is time consuming and it can be hard to find what you need with out know what your looking for.  A good step by step guide to get you off auto and confidently using your camera is like your fast track golden ticket to the fun park!  You can skip all the frustration and be guided right to the fun part of playing and taking great photos.  If you love taking photo’s of your family, you can’t go past our online beginners course, Photography Launch Pad – learn your camera and how to take great family photos at the same time!

five things need get started photography

FOUR | Partners in crime

Learning something new is always better with friends.  It’s always great to have someone to bounce ideas, problems and successes off. Learning with other people can also bring in some accountability, like having a fitness training partner!  Why not find out if a friend wants to learn together, set some goals and have fun learning together.  If your on facebook, there are a lot of communities out there for beginners and don’t forget the good old camera club. You can gain a lot of meeting up face to face and the wide variety of people and skills in camera clubs can be a gold mine!  Many workshops and courses also form spin off groups and communities to help facilitate learning.

FIVE | You time!

Ok so this isn’t the easiest on to find. I get it, I’m a Mum, whether you work or don’t, finding time to yourself can be hard.  Trust me –  it’s really worth making it happen!  Not only will you be a better Mum/wife/partner by spending time on you.  The only way your’e going to learn is to practice.  The good old saying practice makes perfect could have been written for photography.  The more you shoot, the more you play, the more you start to understand how to get the look you want.  Take your camera with you everywhere you go, keep it out on the kitchen table, or even set yourself a photo a day project.  Whatever it takes to get you snapping!