
Sharing & Exporting images in Lightroom Classic CC
Why do we need to export?
We’ve mentioned before, in our fast guide to getting started in Lightroom Classic CC, that Lightroom is a nondestructive editor. This means all the edits you make to your photos in Lightroom, aren’t made to the actual image file. The original image stays the same and Lightroom “overlays” the changes like a filter.
So, once you have your photo looking hunky dory you’ll need to export the image to a new file with all the changes built in, otherwise, all other programs and apps won’t see the changes. While Lightroom makes it as easy as pie, it’s not a one size fits all step, the hard part is knowing what the optimal settings are for your use.
Image files can be tricky, and depending on what you want to do with your photo, exporting it in the right format will make ALL the difference. Seriously – just trying to print a poster of an image that is optimised for the web will give you a weird pixelated result with slightly odd colour to boot!. Even in reverse it’s not great, using a image optimised for printing large on the web doesn’t work, you’ll either crash your site or email with slow load times – or the image will look odd and soft as the web attempts to crunch it.
So size does matter after all!
There’s an ideal size, colour space, file type and more for every purpose. Facebook, Instagram, emailing, the web, prints of various sizes and different media. The best image file for each purpose will be different.
If this makes you want to scream and pull your hair out – don’t – you can set all these ideal settings up once and save them in the present manager and you never have to think of them again. Ever!!
Even better – you can grab my FREE Lightroom export presets and be ready to rock and roll in a jiffy!
[thrive_leads id=’29454′]
Why size and settings matter
Colour space
Colour spaces in digital editing and printing are crucial. Colour spaces are like ” secret codes” telling a printer or screen how to display your image. Unfortunately, understanding colour spaces is tricky, it can be really hard to get a handle on.
The good news is, for basic editing you don’t need to know anything other than which space you need to use. If you decide later on to become a master printer or fine art editor then it can be worth reading up on colour spaces.
Until then, here’s a really good rule of thumb that works every time!
Always use sRGB for web – that includes email and social sharing.
Use either sRGB or AdobeRGB 1998 for printing (ask your print lab which is best)
That’s all you need to know about colour spaces.
Size
Does size really matter? In photography, the answer is a resounding yes! Whether it’s for print or for the web, getting the right overall pixel size for the output will make the difference between your image being soft, pixelated and blurry, or sharp and smooth.
The confusing part is that the right size changes depending on both the overall size and the application. For example, an image that will be displayed on a screen at 5×7” and an image to be printed 5×7” will be different file sizes.
The good news is Lightroom can be set up so you don’t need to understand all the intricacies of file size optimisation to get the right result. You can create “presets” and export your images in just the right format in a single click.
Even better, you don’t even have to set up the export presets yourself – I’m sharing mine with you. For Free! Download and install these presets, choose your desired output and boom! You’re done. Presets are the ultimate time savers.
[thrive_leads id=’29454′]
Exporting in Lightroom Classic CC
Let’s go through the two most common exports together. Step-by-step. Together we will export two versions of an image, one that’s perfect for Facebook and one that’s perfect to print at 5×7″.
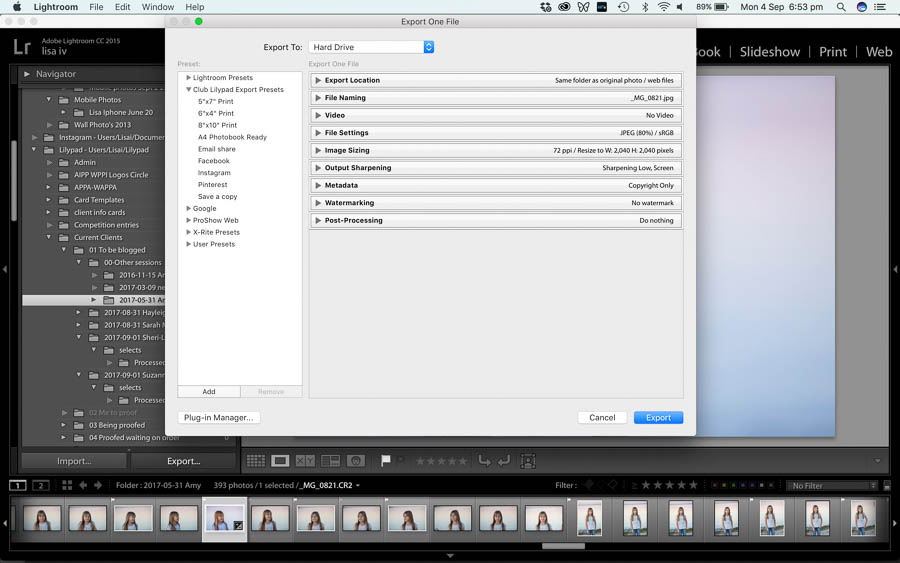
Exporting is done in the library module of Lightroom. Simply select the images you want to export, and click “Export” in the bottom left-hand corner and the export panel will then pop up.
Let’s start with creating an image optimised to look fantabulous on Facebook. What? fantabulous is a word!
Here are the settings you need to look at.
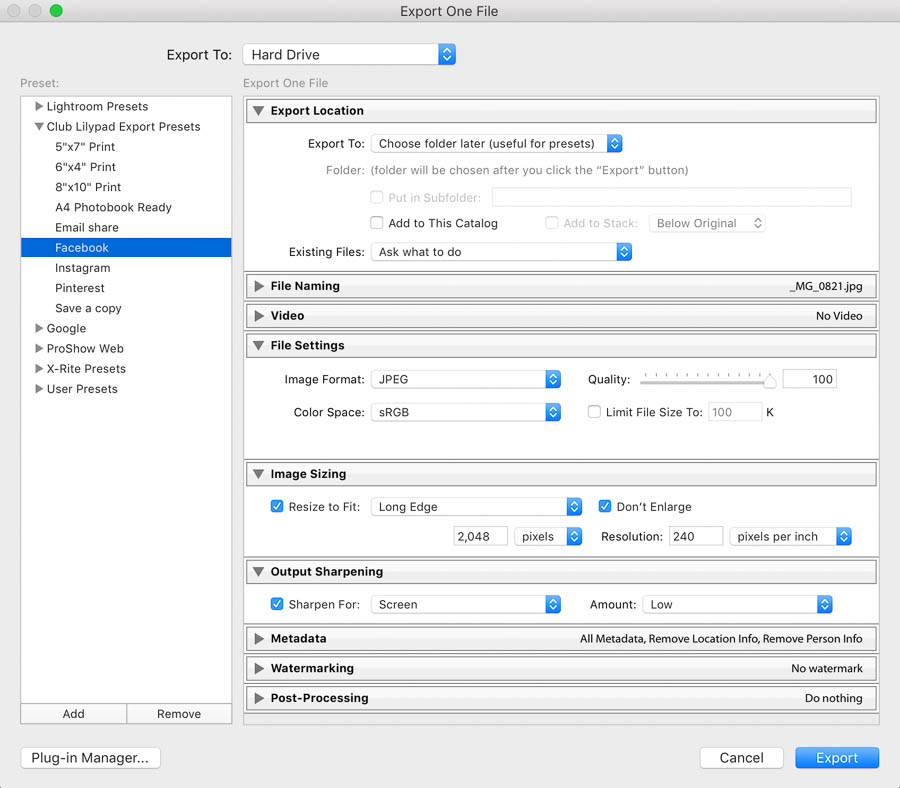
Export location
As a default, I like to select choose folder later. (You can choose the same folder as the original, however, you’ll quickly end up with a lot of images and no idea which was meant to be for what!).
When you press export (after completing all the settings below), Lightroom will then ask you where to put the file. I recommend either in a subfolder named “facebook” or having a folder on your desktop for all your Facebook images. This way you can regularly clean it out without clogging up your hard drive.
File naming
Leave as is.
File settings
Facebook likes jpeg images, in sRGB at a quality of 100.
Image sizing:
Resize to fit the long edge. This is key as not every image will exactly match facebooks dimensions. The import thing is to have the longest edge the correct size and the rest will look after itself. Facebook currently recommends 2048 pixels at 240 pixels per inch for best quality.
Output sharpening.
Sharpen for screen, standard.
Timesaver tip – at this point click “add” in the bottom left-hand corner to save these settings as a preset. Give it a name you’ll remember – like “Facebook”. Next time simply choose it from the dropdown list on the left. No need to remember a thing!
Click export – select your folder for the final image – and you’re done!
Export to print at 6×4” and rename
These are the best settings to export prints to be printed at 6×4”. I’ve set the preset to save to a new folder on the desk top called “Print”. And renamed the file to be “6×4 print [original file name]”. Handy for uploading to your local print lab!
Export location
Choose Export to Desktop
Check “Put in Subfolder” and type Print – this will create a new folder called “Print” on your desktop. I also select “add to catalog” so I can review the exported images in Lightroom.
File naming: Check “Rename To” and select “Custom Name – Original File Number”. In “Custom Text” Type “6×4 print”. Below this field, you will see a preview of the new file name.
File settings
JPEG at a quality of 80 – Reducing the quality to 80 has no material effect on print quality and but will reduce the size of the file you need to upload. This is really helpful for upload times and data usage. I use a pro-lab that prefers files in AdobeRGB. Ask your lab what they prefer and select that option. Consumer labs mostly prefer sRGB.
Image sizing
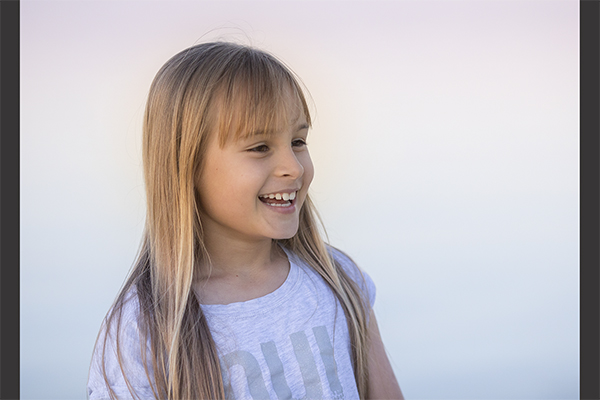
Resize to fit the long edge. Note – make sure your images have been cropped to the same aspect ratio as what you plan to print otherwise you might loose parts of an image or end up with white space. The image below is cropped to the aspect ratio of 5×7. Printed at 6×4, parts of the image will be cropped off or it will print with spaces on the side.
Choose 6 and inches, at a resolution of 300ppi. I also check “Don’t enlarge” as most original images will be at least this big. And if not, most images print perfectly at resolutions as low at 200dpi. Enlarging an image unnecessarily could result in a fuzzy image.
Output sharpening
Glossy paper and low. Of course, if you are using matt paper – choose this instead. If you find you are a “heavy” sharpener in Lightroom, don’t sharpen at this step at all.
Timesaver tip – at this point click “add” in the bottom left-hand corner to save these settings as a preset. Give it a name you’ll remember – like 6×4 print. Next time simply choose it from the dropdown list on the left. No need to remember a thing!

Click export – select your folder for the final image – and you’re done!

Facebook Comments